How To Bake The Perfect Black Forest Cake
Discover the Ultimate Black Forest Chocolate Cake Recipe for Your Home Kitchen: Essential Ingredients and Steps!
 As I embark on this delightful journey through the world of Black Forest Chocolate Cake, I am reminded of the rich history and origin that this indulgent dessert carries with it. There’s something undeniably charming about this classic cake that has captured the hearts and taste buds of generations. In this article, we’ll explore the fascinating history of the Black Forest Chocolate Cake, understand why making it at home is a fantastic idea, and delve into the essential ingredients that make this cake a true masterpiece.
The Enigmatic Origins of Black Forest Chocolate Cake
The Black Forest Chocolate Cake, known as “Schwarzwälder Kirschtorte” in its native German, hails from the picturesque Black Forest region of Germany. Its roots can be traced back to the early 20th century, and it quickly became a symbol of the region. This delectable creation combines layers of moist chocolate cake, cherries, and whipped cream, all adorned with chocolate shavings.
LSI Terms: German dessert, Schwarzwälder Kirschtorte, Black Forest region
A Timeless Classic
There’s no denying the enduring popularity of the Black Forest Chocolate Cake. Whether it’s a special occasion, a family gathering, or just a momentary craving for something sweet, this cake has always been a go-to choice. Its perfect blend of flavors, textures, and aesthetics makes it a standout dessert.
LSI Terms: Classic dessert, timeless dessert, enduring popularity
Why Make Black Forest Chocolate Cake at Home?
Now, you might wonder why bother making this classic cake in your own kitchen when it’s readily available in bakeries? Well, there are several compelling reasons to roll up your sleeves and take on the challenge:
- Personalization: When you make it at home, you have complete control over the ingredients, allowing you to adjust the sweetness, tartness, or richness to suit your preferences.
- Quality Ingredients: You can choose the highest quality ingredients, ensuring that your cake is made with the finest chocolate, freshest cherries, and creamiest whipped cream.
- Homemade Love: There’s something profoundly satisfying about creating a homemade dessert for your loved ones. The effort and care you put into it make each bite more special.
LSI Terms: Homemade dessert, quality ingredients, personalization
Now that we’ve established why baking a Black Forest Chocolate Cake at home is such a wonderful idea let’s move on to the core of our journey: the essential ingredients that make this cake a masterpiece.
In the next section, we’ll explore each of these essential ingredients, from the importance of high-quality chocolate to the significance of selecting the right type of flour and sugar. Join me in unraveling the secrets behind this delectable creation.
Essential Ingredients for Black Forest Chocolate Cake
Welcome back to our journey of creating the perfect Black Forest Chocolate Cake. In the first part of our exploration, we delved into the rich history and enduring popularity of this beloved dessert. Now, it’s time to get down to the nitty-gritty details – the essential ingredients that transform ordinary components into a culinary masterpiece.
The Role of High-Quality Chocolate
Chocolate, the very heart of any chocolate cake, plays a pivotal role in the taste and texture of our Black Forest delight. When crafting this cake, it’s essential to use high-quality chocolate. I vividly recall the first time I used premium dark chocolate in my recipe; the result was a cake with a profound cocoa flavor and a melt-in-your-mouth experience. Here’s what you should know:
- Cocoa Content: Look for dark chocolate with at least 70% cocoa content. This ensures a rich, deep chocolate flavor.
- Melting Technique: Melt the chocolate gently using a double boiler or a microwave at low power to prevent scorching.
- Chocolate Type: Experiment with different chocolate varieties, such as semi-sweet or bittersweet, to find your preferred flavor balance.
LSI Terms: High-quality chocolate, cocoa content, chocolate varieties
Fresh vs. Canned Cherries
The second star of our show is cherries. They provide a delightful burst of fruity sweetness that complements the chocolate beautifully. Now, the eternal question is, should you use fresh or canned cherries? I’ve explored both options, and here’s what I’ve learned:
- Fresh Cherries: If they’re in season, fresh cherries can be a wonderful choice, offering a juicy and vibrant taste.
- Canned Cherries: Canned cherries are available year-round and are often preserved in a sweet syrup, which can infuse your cake with an extra layer of flavor.
Choose based on availability and personal preference. Whichever you select, ensure they are pitted.
LSI Terms: Fresh cherries, canned cherries, cherry varieties
Achieving the Perfect Whipped Cream Consistency
Whipped cream is the crowning glory of our Black Forest Chocolate Cake. Achieving the perfect consistency is crucial. Too runny, and it won’t hold its shape; too stiff, and it loses its delightful lightness. Here’s how to master it:
- Cold Utensils: Start with chilled bowls and beaters. This helps the cream whip up faster and fluffier.
- Heavy Cream: Use heavy cream with a fat content of at least 36%. It whips up beautifully.
- Sweetness: Add a touch of powdered sugar and vanilla extract for a hint of sweetness and flavor.
Whip until you reach soft peaks – when the cream holds its shape but is still smooth and billowy.
LSI Terms: Whipped cream consistency, heavy cream, sweet whipped cream
Selecting the Right Flour and Sugar
The cake’s foundation lies in the flour and sugar you choose. These ingredients determine the cake’s texture and sweetness level. I’ve experimented with various combinations, and here’s what I’ve found:
- All-Purpose Flour: It’s a versatile choice for a balanced cake texture. Cake flour makes it lighter, while whole wheat flour adds a nuttier flavor.
- Sugar Type: Granulated sugar is the standard choice, but brown sugar can add a hint of caramel flavor.
Experiment with different flour and sugar combinations to tailor your cake to your liking.
LSI Terms: Cake texture, flour options, sugar types
Eggs and Butter: Building Texture and Flavor
Lastly, we have eggs and butter, two ingredients that contribute significantly to the cake’s texture and flavor. Eggs provide moisture, structure, and richness, while butter imparts a creamy taste. Here’s what you need to know:
- Room Temperature: Ensure both eggs and butter are at room temperature for easy mixing and proper incorporation into the batter.
- Egg Size: Large eggs are the standard choice for most cake recipes.
- Butter Type: Unsalted butter is preferred as it allows better control of the cake’s overall saltiness.
Mastering the balance of these ingredients is key to achieving a moist and flavorful Black Forest Chocolate Cake.
LSI Terms: Egg and butter in cake, room temperature ingredients, butter type
Now that we’ve covered the essential ingredients, we’re well-prepared to move on to the exciting part: crafting the Black Forest Chocolate Cake itself. In Section 3 – Step-by-Step Recipe Guide, we’ll dive into the detailed instructions for creating this masterpiece from scratch.
Stay tuned for the next chapter of our baking adventure!
Step-by-Step Recipe Guide: Creating Your Black Forest Chocolate Cake
Welcome back to our delightful journey in crafting the perfect Black Forest Chocolate Cake. In our previous sections, we’ve uncovered the history of this classic dessert and explored the essential ingredients that form the heart and soul of our masterpiece. Now, it’s time to roll up our sleeves and dive into the exciting process of bringing this cake to life in your home kitchen.
Preparing the Cake Batter
Creating the perfect Black Forest Chocolate Cake begins with a delectable cake batter. Here’s your step-by-step guide:
- Gather Your Ingredients: Ensure all your ingredients are at the ready. You’ll need the chocolate, flour, sugar, eggs, butter, and more.
- Melt the Chocolate: Begin by melting your high-quality chocolate. Use a double boiler or the microwave at low power, stirring until it’s smooth and glossy.
- Mix the Dry Ingredients: In a separate bowl, combine your flour and sugar. This mixture will provide the dry foundation for your cake.
- Cream the Butter and Sugar: In another bowl, beat the softened butter and sugar until it’s light and fluffy. This helps incorporate air into the batter.
- Add Eggs and Melted Chocolate: Gradually add your eggs to the butter and sugar mixture, beating well after each addition. Then, pour in the melted chocolate, mixing until it’s fully incorporated.
- Fold in the Dry Ingredients: Gently fold your dry ingredient mixture into the wet ingredients until just combined. Avoid overmixing, as this can make the cake dense.
- Bake the Cake Layers: Divide the batter between your prepared cake pans and bake until a toothpick inserted into the center comes out clean.
LSI Terms: Cake batter preparation, melting chocolate, creaming butter and sugar
Baking the Cake Layers
The aroma of chocolate fills your kitchen as the cake layers bake to perfection. Here’s how to ensure they turn out flawlessly:
- Properly Preheated Oven: Make sure your oven is preheated to the correct temperature before placing the cake pans inside.
- Even Layers: Rotate the cake pans halfway through baking to ensure even cooking.
- Testing for Doneness: Use a toothpick or cake tester to check if the layers are done. It should come out clean with no wet batter clinging to it.
LSI Terms: Cake layer baking, even cooking, doneness test
Making the Cherry Filling
Now, let’s talk about the luscious cherry filling that adds a burst of fruity flavor to our cake:
- Choose Your Cherries: Whether you’ve opted for fresh or canned cherries, make sure they’re pitted.
- Simmer and Sweeten: If using canned cherries, simmer them with a bit of sugar and cornstarch to create a sweet and slightly thickened cherry filling.
- Cool It Down: Allow the cherry filling to cool before using it in your cake.
LSI Terms: Cherry filling preparation, simmering cherries, thickened cherry filling
Assembling the Layers
Assembling the layers is where our cake truly takes shape:
- Level the Layers: If necessary, trim the tops of your cake layers to ensure they’re level.
- Layer with Cherries and Cream: Place one cake layer on your serving plate and top it with a generous layer of cherry filling and whipped cream.
- Repeat: Add the second layer and continue the process until all layers are stacked, with cherries and cream between each.
- Cover with Cream: Frost the entire cake with a final layer of whipped cream.
LSI Terms: Cake layer assembly, leveling layers, frosting with whipped cream
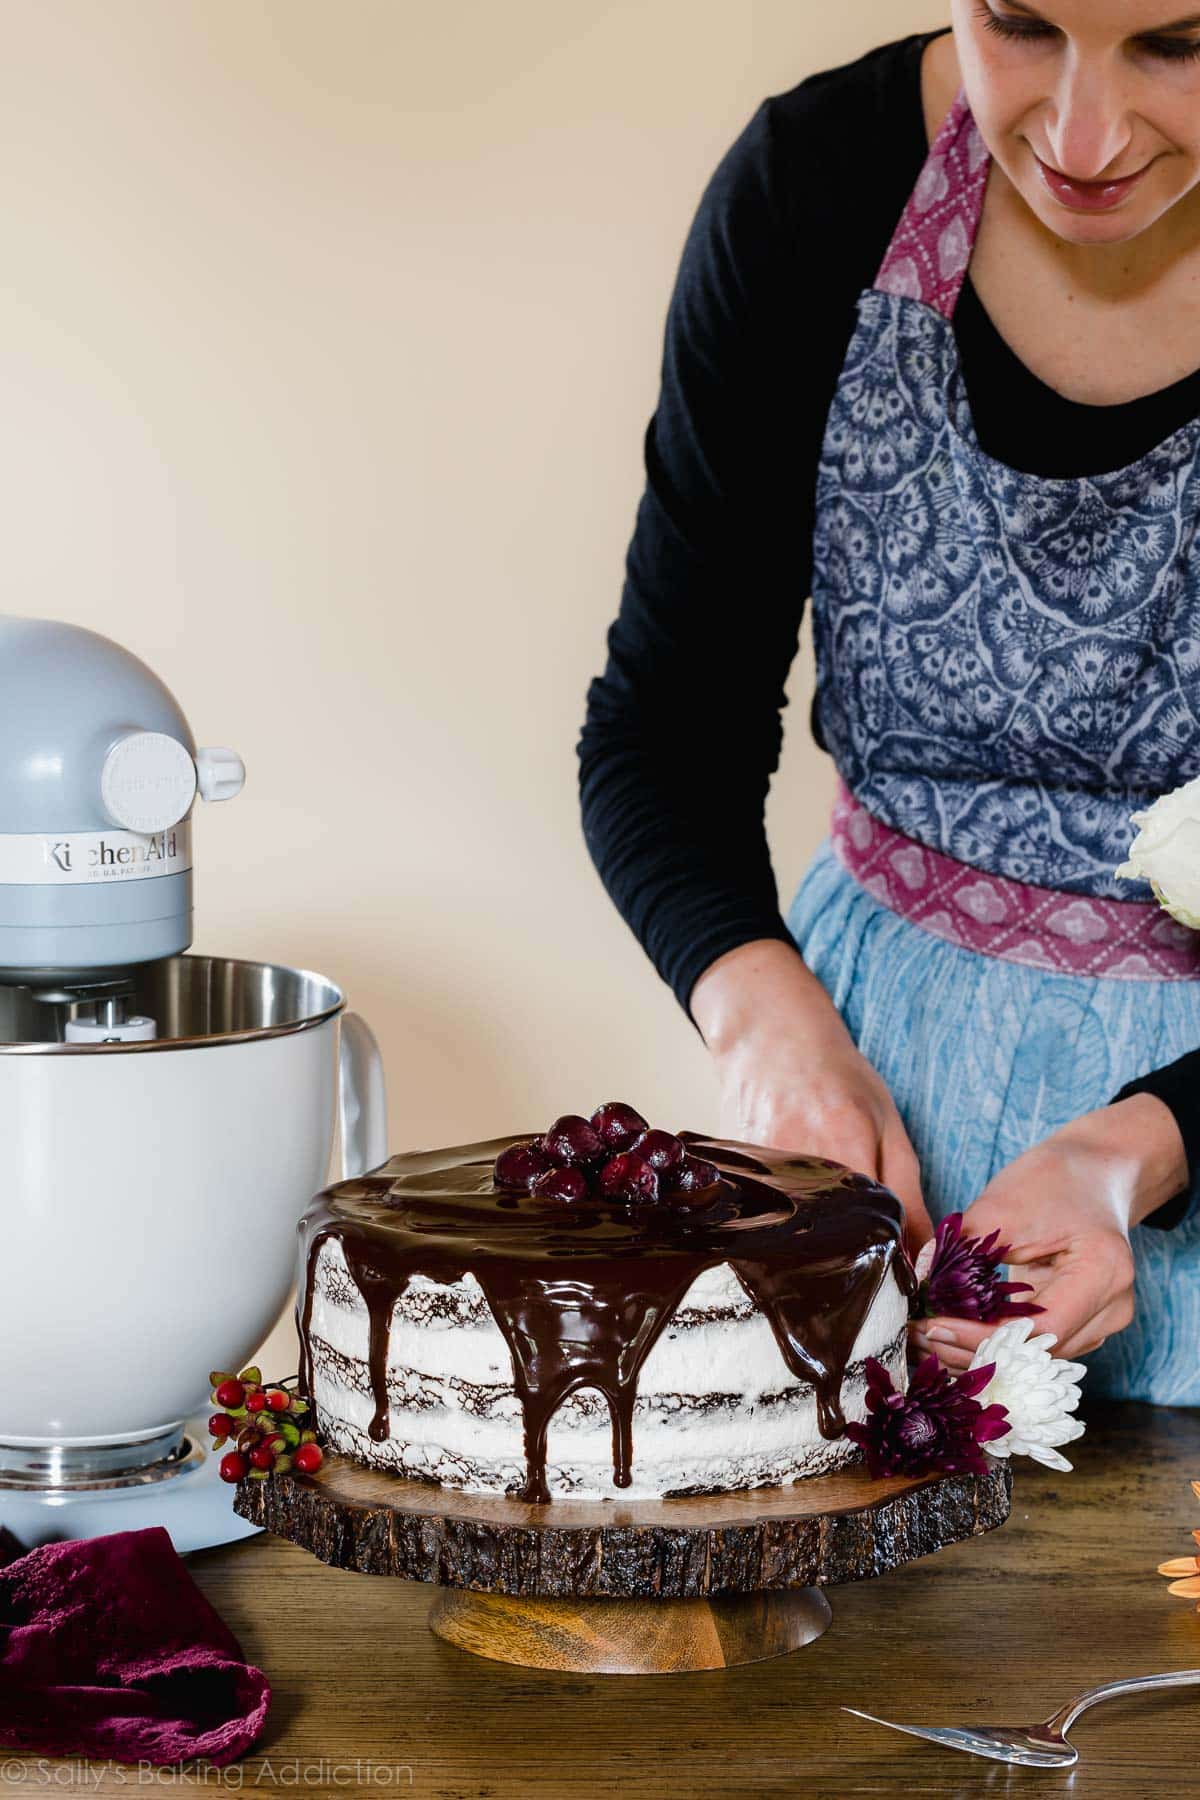
Decorating with Whipped Cream and Chocolate Shavings
The final touch of decorating transforms our cake into a work of art:
- Whipped Cream Swirls: Use a piping bag to create elegant swirls of whipped cream around the top edge of the cake.
- Chocolate Shavings: Sprinkle chocolate shavings generously over the whipped cream, adding a delightful contrast in texture and taste.
LSI Terms: Cake decoration, whipped cream swirls, chocolate shavings
Tips and Tricks for Success in Each Step
- Room Temperature Ingredients: Ensure that ingredients like butter and eggs are at room temperature for smoother mixing.
- Precision with Measurements: Use measuring cups and spoons for accurate ingredient proportions.
- Patience is Key: Allow your cake layers to cool completely before assembling to prevent the whipped cream from melting.
With your Black Forest Chocolate Cake beautifully assembled and decorated, it’s almost time to savor the fruits of your labor. But before we indulge, let’s explore the exciting world of variations and creative ideas for this classic dessert. In
Variations and Creative Ideas for Your Black Forest Chocolate Cake
Welcome back to our culinary adventure where we’re exploring the many facets of creating the perfect Black Forest Chocolate Cake. We’ve journeyed through its history, uncovered the essential ingredients, and mastered the art of crafting this delightful dessert. Now, it’s time to add a personal touch and creativity to our cake.
Different Variations of Black Forest Chocolate Cake
One of the joys of baking is the opportunity to get creative and add your unique spin to a classic recipe. Here are some exciting variations of the Black Forest Chocolate Cake:
1. Mini Black Forest Cupcakes
If you’re hosting a party or just want to try a bite-sized version of this classic, consider making mini Black Forest cupcakes. They are perfect for sharing and look adorable on any dessert table.
- Bite-Sized Bliss: These mini treats are a hit with both kids and adults, offering a taste of the Black Forest in a single bite.
- Easy to Decorate: You can experiment with different decorating techniques, making each cupcake a little work of art.
LSI Terms: Mini Black Forest cupcakes, bite-sized desserts, cupcake decorating
2. Vegan or Gluten-Free Options
Catering to dietary preferences and restrictions has never been easier. You can adapt the Black Forest Chocolate Cake recipe to make it vegan or gluten-free.
- Vegan Delight: Use plant-based milk, egg substitutes, and dairy-free whipped cream to create a vegan-friendly version.
- Gluten-Free Goodness: Replace traditional flour with gluten-free alternatives like almond flour or a gluten-free baking blend.
LSI Terms: Vegan Black Forest Cake, gluten-free dessert, dietary preferences
3. Black Forest Trifle
Transform the classic cake into a delightful trifle. Layer cake pieces, cherries, and whipped cream in a glass bowl for a stunning presentation.
- Elegant Dessert: Trifles are visually appealing and perfect for serving at gatherings.
- Layered Flavor: Each spoonful offers a blend of cake, cherries, and whipped cream in every bite.
LSI Terms: Black Forest trifle, dessert presentation, layered flavors
Creative Decorating Ideas
Decorating your Black Forest Chocolate Cake can be a fun and artistic endeavor. Here are some creative decorating ideas to inspire you:
1. Chocolate Ganache Drizzle
Drizzling a rich chocolate ganache over the cake not only adds a glossy finish but also intensifies the chocolate flavor.
- Dessert Drama: The shiny ganache drizzle creates a dramatic visual contrast with the whipped cream.
- Enhanced Flavor: The extra layer of chocolate enhances the overall taste.
LSI Terms: Chocolate ganache drizzle, dessert decoration, intensified flavor
2. Edible Flowers and Garnishes
Elevate the elegance of your cake by adorning it with edible flowers and garnishes. Not only do they look stunning, but they also add a touch of freshness.
- Natural Beauty: Edible flowers bring a touch of nature to your dessert.
- Play with Colors: Experiment with different flower colors and shapes for a visually appealing cake.
LSI Terms: Edible flower decorations, cake garnishes, natural cake decor
3. Personalized Cake Designs
For special occasions, consider personalizing your Black Forest Cake with custom designs or messages.
- Custom Creativity: Get artistic with frosting designs, whether it’s a birthday message or a special symbol.
- Memorable Moments: Personalized cakes make celebrations even more meaningful.
LSI Terms: Custom cake designs, personalized cakes, frosting creativity
Highlighting the Versatility of the Recipe
The beauty of the Black Forest Chocolate Cake lies in its adaptability. You can tailor it to suit your preferences and occasions, making it a versatile dessert that can be enjoyed year-round.
As you explore these variations and decorating ideas, remember that the Black Forest Chocolate Cake is not just a dessert; it’s a canvas for your creativity. Now, let’s transition to the final stage of our culinary journey: serving and savoring your creation.
Stay tuned for the grand finale of our Black Forest Chocolate Cake adventure!
Serving and Enjoying Your Black Forest Chocolate Cake: A Sweet Culinary Finale
As we arrive at the final chapter of our journey into the world of Black Forest Chocolate Cake, it’s time to explore the gratifying moments of serving, savoring, and sharing this delectable creation. We’ve embarked on a culinary adventure, learning about its history, essential ingredients, step-by-step recipe, creative variations, and decorating techniques. Now, let’s complete this delightful experience with the art of presentation and appreciation.
Proper Storage and Shelf Life
Before we dive into serving, it’s essential to understand how to store your Black Forest Chocolate Cake to keep it fresh and delicious:
- Refrigeration: Due to its whipped cream topping, store your cake in the refrigerator. Cover it with plastic wrap or a cake dome to prevent it from drying out or absorbing other odors in the fridge.
- Shelf Life: Your cake will remain at its best for 2-3 days in the fridge. Beyond that, it may start to lose its freshness.
LSI Terms: Cake storage, refrigeration, preserving freshness
Serving Suggestions and Portion Sizes
The moment has come to slice and serve your masterpiece. Here are some serving tips to make the experience even more delightful:
- Slice with Care: Use a sharp knife dipped in hot water to make clean, beautiful slices.
- Portion Control: Black Forest Chocolate Cake is rich, so consider smaller portions. A slice of about 1.5 inches is usually perfect.
- Garnish: Add a fresh cherry or a chocolate shaving on top for an extra touch of elegance.
LSI Terms: Cake serving tips, portion control, garnish ideas
Pairing the Cake with Beverages
To elevate the indulgence, consider pairing your Black Forest Chocolate Cake with complementary beverages:
- Coffee: A cup of freshly brewed coffee pairs wonderfully with the rich, chocolatey flavors of the cake.
- Wine: For a more sophisticated experience, try a glass of red wine, such as a Pinot Noir or Merlot, which complements the cherries.
LSI Terms: Cake and beverage pairing, coffee and cake, wine and dessert
Capturing the Moment with Photography
In today’s age, no culinary journey is complete without a photo to share with friends and family. Here are some photography tips:
- Natural Light: Capture your cake in natural daylight for the best results.
- Angles and Close-Ups: Experiment with different angles and close-up shots to showcase the details of your creation.
- Share Online: Encourage others to share their homemade creations online with the hashtag #BlackForestDelight.
LSI Terms: Cake photography, food photography tips, social media sharing
Encourage Readers to Share Their Homemade Creations
Now that you’ve crafted your Black Forest Chocolate Cake to perfection, it’s time to share your joy with others. Encourage your fellow bakers and cake enthusiasts to share their creations online, spreading the love for this classic dessert.
Use the hashtag #BlackForestDelight to connect with a community of passionate bakers and dessert lovers. Your creation could inspire others to embark on their own culinary adventures.
LSI Terms: Community of bakers, online sharing, dessert enthusiasts
In conclusion, our journey through the world of Black Forest Chocolate Cake has been a delectable exploration of history, ingredients, recipes, creativity, and presentation. Whether you’re a seasoned baker or a novice in the kitchen, this iconic dessert offers endless opportunities for personalization and enjoyment.
I hope you’ve enjoyed this series of articles as much as I have enjoyed sharing my passion for baking with you. From the roots of the Black Forest to the heights of creativity in decorating, every step has been a delightful adventure.
Now, it’s your turn. Take what you’ve learned, embrace your inner baker, and create your own Black Forest Chocolate Cake masterpiece. Share your photos, stories, and the joy of homemade desserts with the world. Let the aroma of chocolate and cherries fill your kitchen, and may your cakes be as sweet as the memories you create.
Thank you for joining me on this culinary journey. Until our next baking adventure, happy baking, and #BlackForestDelight!